Your Ultimate Guide to Sustainable Halloween Decorations
We all love Halloween. Obviously. And we’re all dying to decorate our homes for the season and have our friends over for a wild, spooky party. Unfortunately though, most of the items available in stores are not sustainable halloween decorations, but mass produced plastic junk.
Junk which has usually been designed to be used once and thrown away. Where it won’t break down in landfill for hundreds of years.
Now that’s what I call a nightmare.
You may be reading this article because you think I’m going to provide you with a list of stores selling sustainable Halloween decorations. So you can get down to decorating, already!
But you would be wrong. Dead wrong. Are you sick of the bad puns yet? Are they just killing you? The same way plastic, entitlement, laziness and greed are killing the planet?
No, rather than buying things, I’m going to encourage you to use things you already have. In ways you may not have thought of.
I’ll give you some DIY ideas, as well as tips for how to shop for sustainable Halloween decorations (if you absolutely must shop!)
Then I’ll show you how to combine and layer eclectic pieces and materials, to create a rich and original Halloween Party display.
This article is a complete guide, so it’s a long one! Grab yourself a Pumpkin Spice Latte, a cozy blanket get, and comfortable before you dive in.
The most Sustainable Halloween Decorations are the ones you already own!
This is my number one sustainable design tip. It applies to everything.
The most sustainable way to shop for decor (or anything really) is to ‘shop’ things you already own.
Believe it or not, even your old plastic decorations are more sustainable than brand new “sustainable” Halloween decorations. As long as you actually use them and look after them.
Think outside the box when it comes to sustainable Halloween decorations
Before you even think about shopping, have a look around your home with an eye to repurposing. Don’t just look for things which obviously scream “Halloweeeeeen!!!” either.
You might be surprised at how many potential sustainable halloween decorations you already have just lying around!
Check your wardrobe: dark lacy shawls or scarves are great for creating a moody base layer or backdrop.
Look in your linen closet: doilies can make great spiderwebs and vintage linens can add a more cottagecore or nostalgic vibe (as shown below).
Raid your jewellery box: antique and vintage jewellery add a modest amount of sparkle.
Borrow from your bookcase: a stack of old hardback books is the perfect way to add height to your display.
Gather from the garden: fresh seasonal or dried flowers and foliage from the garden or local area give life and movement to a display. Or you can use dried flowers/foliage for a dark Morticia Addams vibe, which I also love!
Pretty much any items you own can be repurposed as sustainable halloween decorations. Think about candles, candle holders, nick nacks, vases, mirrors, trinket dishes, glassware, ceramics, houseplants, books, jewellery, textiles, etc.
You are literally only limited by your own imagination!
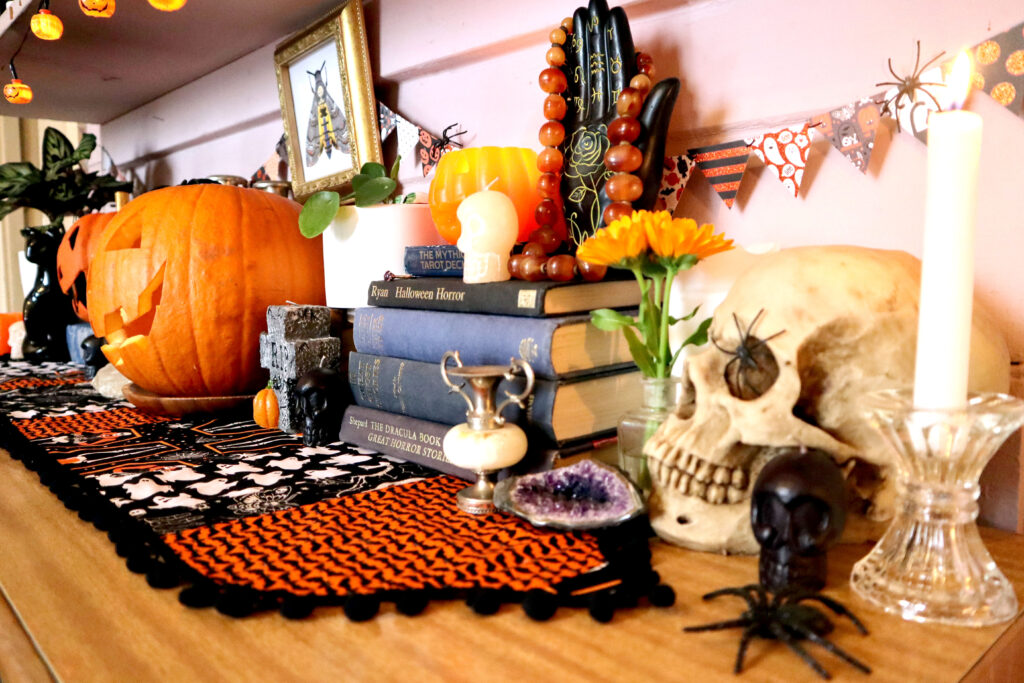
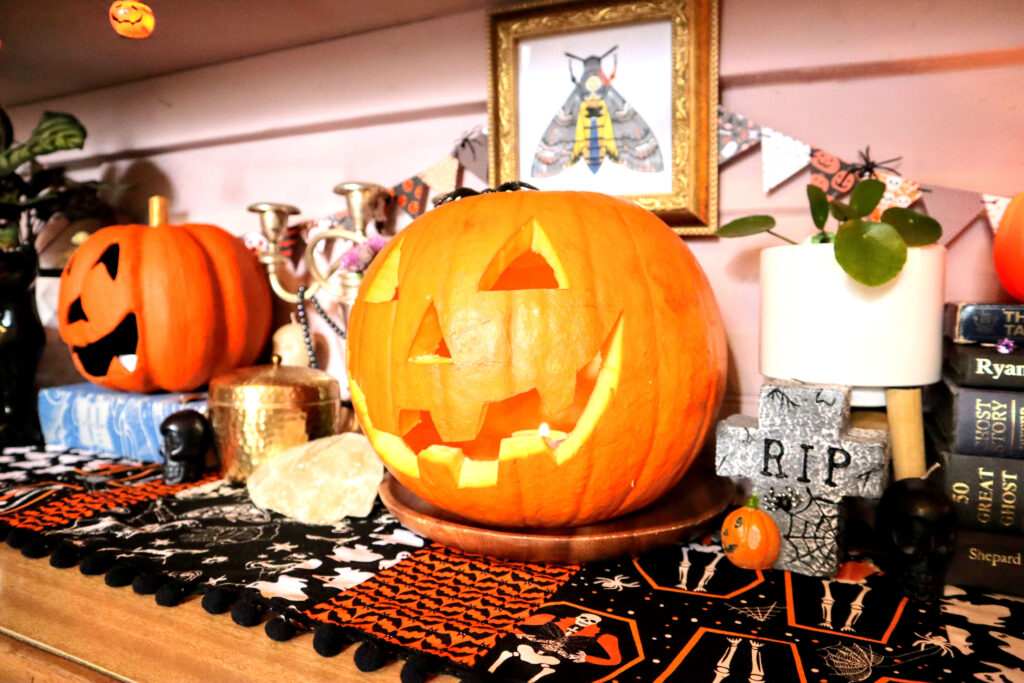
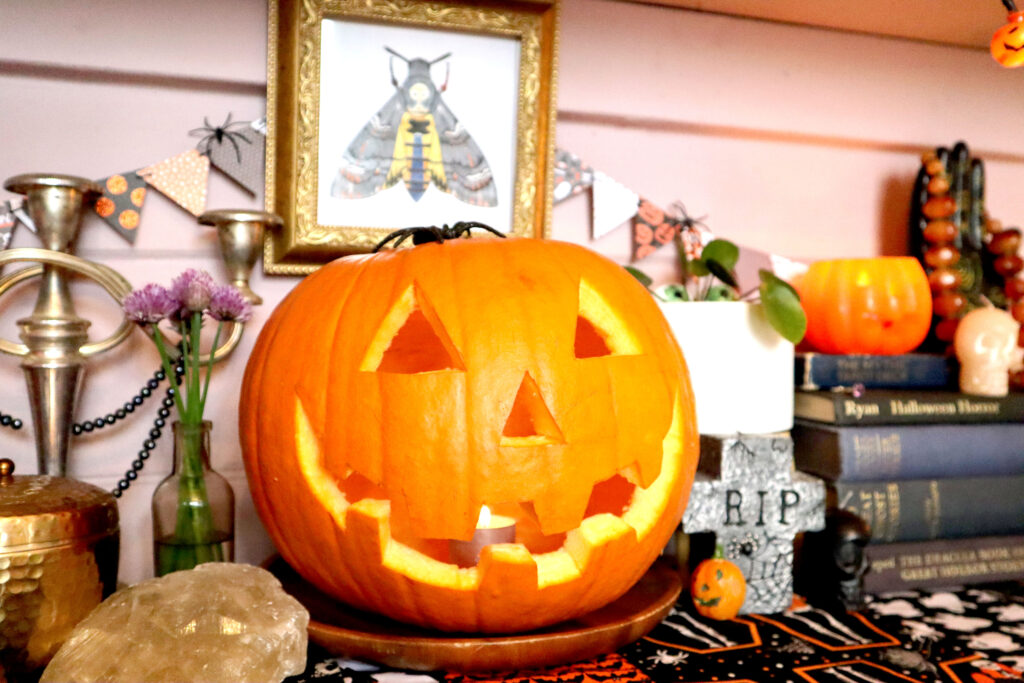
Anatomy of a display created using Sustainable Halloween Decorations
In this section I’ll be referencing my 2020 Halloween display, and giving a detailed breakdown of the sustainable Halloween decorations I used to create it.
I’ll also share some of my favourite design tips.
Challenge yourself not to buy anything new
Or at least limit it to just a few carefully thought out items, which will last and be used forever.
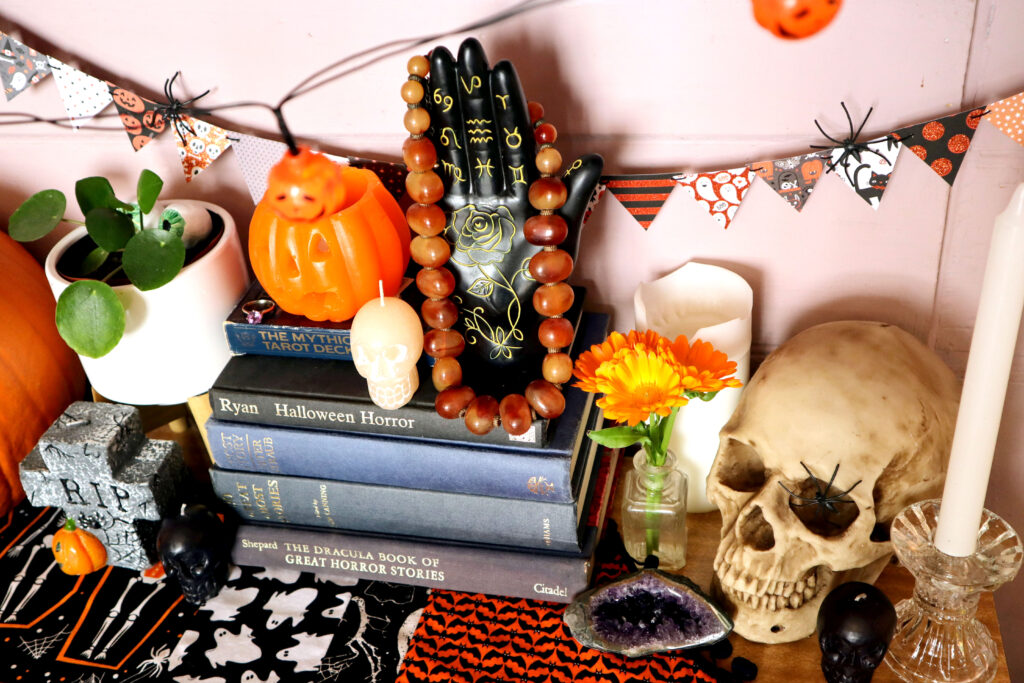
For my 2020 Halloween display, I only bought two new items for the entire display. The brown papier mache jack-o’-lantern and the resin palmistry hand.
I only bought the jack-o’-lantern and painted it because I wasn’t sure if we’d be able to buy carving pumpkins in our small rural Australian supermarket, during lockdown, and I wanted to make sure I had a centrepiece for my Halloween display.
We did manage to get a pumpkin, but the papier mache one is something I will use every year anyway.
The palmistry hand is something I really felt drawn to use it as year round decor, so it doesn’t really count as “Halloween decor”. It’s also made of resin, as opposed to plastic, which tends to last a lot longer.
Everything else was either handmade or shopped from a combination of my regular decor and the same collection of sustainable Halloween decorations I use every year.
Your regular decor makes excellent sustainable Halloween decorations
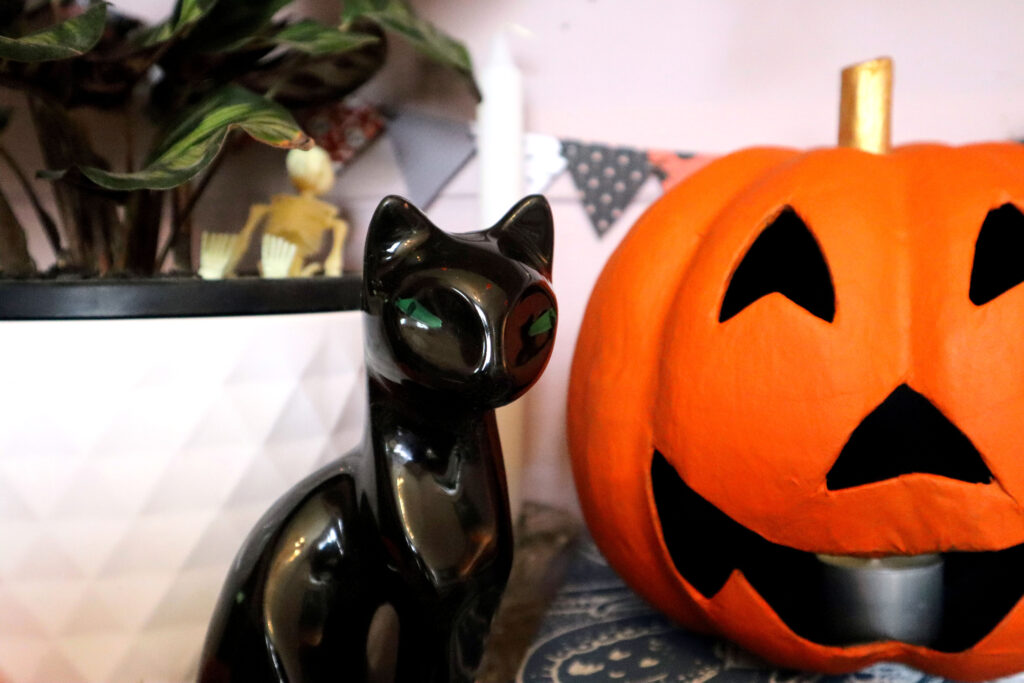
Most of the items I used to create this display were not Halloween specific, but general decor items I use year round. The thrifted vintage decor items I used in this display are the silver and glass candle holders, small vases and medicine bottles, and the black ceramic cat.
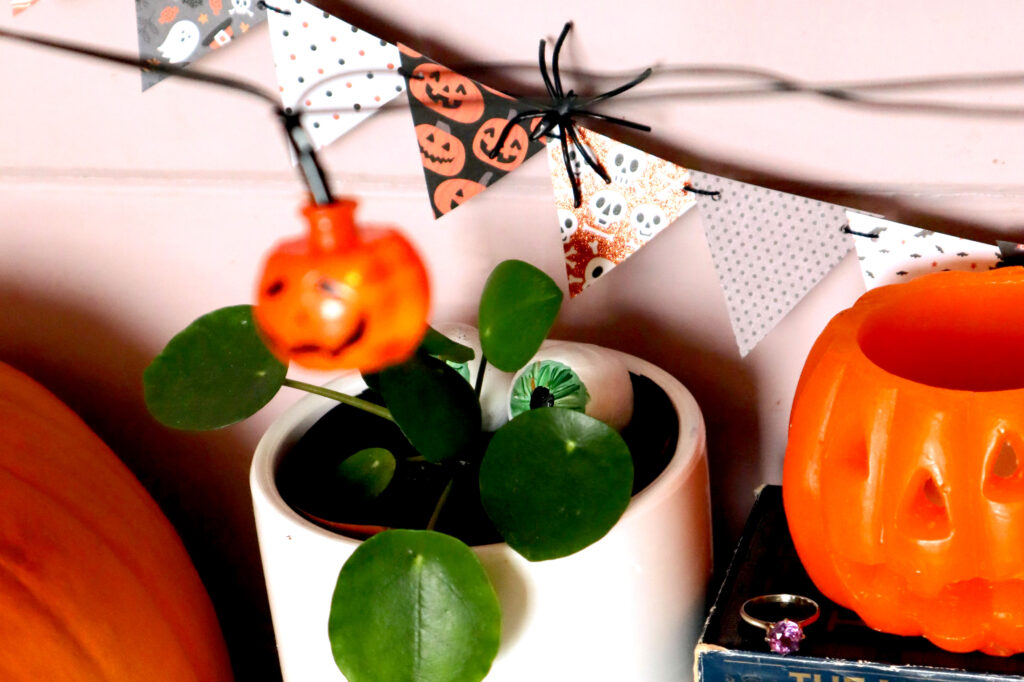
The houseplants are also part of our regular decor. I just added a couple of air-dry clay eyeballs my husband Dan made years ago to one, and a plastic skeleton to the other, so they felt like part of the display. Adding a “spooky” element to everyday items is a great way to turn them into sustainable Halloween decorations.
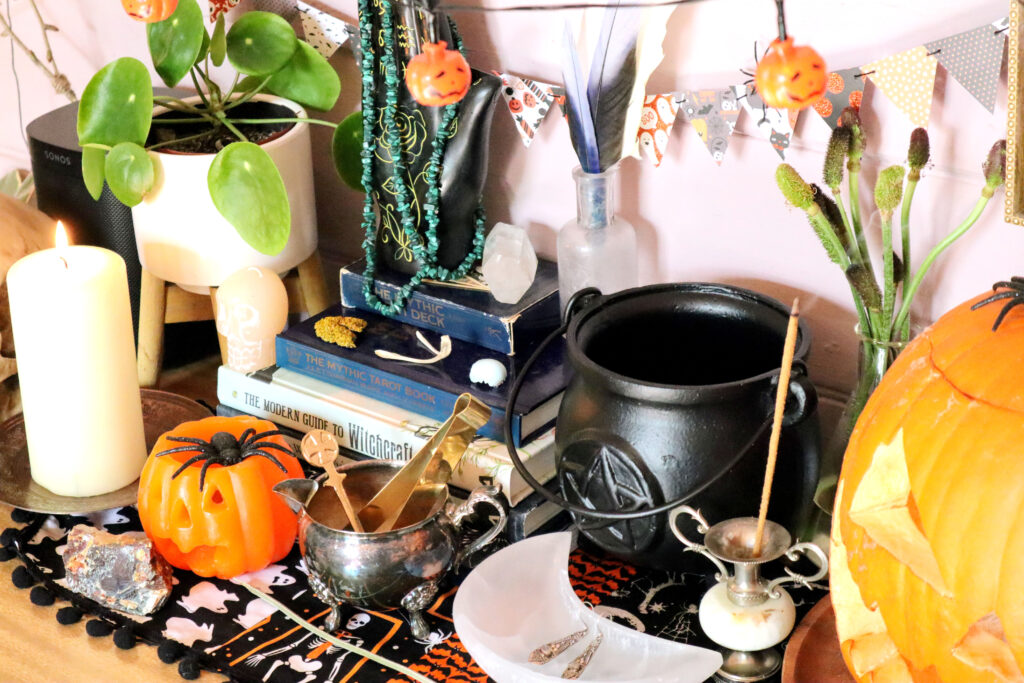
I’ve had the tarot deck since I was 11 and I used pieces of vintage jewellery from my personal collection to add interest and a bit of sparkle. I used an orange bakelite necklace, a strand of black pearls, an amethyst ring, and a copper monogram brooch.
The crystals are part of Dan’s rock collection, he accumulated them while working at a metaphysical store when he was younger. The gold tin is a citronella candle I bought new. We use them to keep mosquitoes away at night, but I clean and reuse the tins for storage.
Old books make excellent sustainable Halloween decorations
I used thrifted vintage hardback ghost stories I have collected over the years to create height and interest in my display.
With the dust jackets off, a lot of vintage hardbacks have really moody muted dark cloth covers (or at least spines) with gold or silver lettering.
Which I happen to love! But if you don’t like the covers, you can always turn them the other way around and have the aged pages showing instead, or wrap them in recycled brown paper or other decorative paper.
This is definitely my favourite way to create height in a display. Especially for eclectic vintage style displays.
You can also use a pretty box or chest with a flat lid to create height, or drape a plain box with fabric to create a riser.
Items gathered from nature make excellent sustainable Halloween decorations
Besides the obvious pumpkins and gourds, think about any other natural sustainable halloween decorations you might be able to add, then go collect or (ethically) forage them. Consider using fresh or dried flowers, herbs, grains, grasses, foliage, feathers, nuts, seedpods, pinecones etc.
Don’t buy stuff like this, it’s a bit weird, and may not be ethically or sustainably sourced. Just collect things from your own yard or local area. Spend some time in nature and develop your connection to your surroundings instead. Just be careful to not disturb any critters.
It’s spring time here in Australia during Halloween, so most of the “fall’ seasonal decor doesn’t feel very appropriate. Instead I used fresh calendula (orange) and chive (purple) flowers in my small vintage glass bottle and inkwell vases. It’s always nice to use natural elements to give a bit of life and movement to a display.
The plastic Halloween decorations you already own make excellent sustainable Halloween decorations
I bought the resin skull, rubber spiders, plastic skeletons and jack-o’-lantern string lights to decorate our house for our Halloween engagement party 9 years ago. The same lights still work and they’re so cute that we actually had them up as year round decor for about five years!
As long as the plastic decorations you already own are well made and you look after them, they are sustainable. Throwing them out so you can buy more new “sustainable” Halloween decorations, is far more unsutainable than using plastic decorations you already have.
This is why I still include some plastic items in my displays and product photo styling, despite it seeming “unsustainable” at first glance. Because NOT using plastic decorations you already own, is actually more unsustainable than not using them at all, just because they’re plastic.
This doesn’t include fake spider webs though
For the record, the small plastic spiders hanging on the mini bunting were from one of those fake spider webs I also bought for the engagement party.
I would never buy or use fake spider webs again because they definitely do not fit into the category of sustainable halloween decorations. They’re made of plastic, are really tough to clean up properly or reuse, and can kill wildlife and insects trapped in them if used outdoors. They look cool, but they are really awful. Please don’t buy or use them.
I only used them because we had half demolished the wall between the kitchen and lounge in our old house and only the rough old studs were left. It looked terrible, but it was the perfect framework for a giant spiderweb.
I wasn’t quite as conscious of sustainability issues back then and it easily solved an unattractive problem in my home, so I didn’t think twice.
If I was going to attempt something like that again, I’d try using cotton wool balls or some thrifted cotton string or wool yarn to make a web instead. Then I’d try to reuse them if possible, or compost them when I was done.
Obviously I did keep the little plastic spiders that came with the fake web though! They’re great because they have handy little hooks on the back so they hang well on things like the mini bunting I made.
Which brings me nicely to…
Make your own Sustainable Halloween Decorations
The following projects are my original designs, but I also can’t recommend Pinterest enough when it comes to DIY projects and design inspo. If you don’t have an account, you should definitely consider making one!
For my 2020 display I started planning early (I had plenty of time to think during Victoria’s seemingly perpetual harshest-in-the-world lockdown) for how I wanted it to look.
I bought a papier mache pumpkin, one metre each of four different Halloween print fabrics and a 6×6 inch pad of Halloween themed scrapbooking paper. I made four DIYs for this display, read on to find out how I went about each one.
DIY Halloween mini bunting
Click here to find out how to make your own Halloween mini bunting.
If you don’t want to go to the effort of making your own bunting from scratch, there are several different Halloween Mini Bunting and Garland printables available for purchase in my Etsy Store. Please note, they are seasonal, so you won’t find them if you’re looking outside of spooky season!
DIY Sustainable Batty Halloween Garland
I have added a bat template printable to my Free Printables page. It has bats of various shapes and sizes, you could make a bat garland like I did!
Click here to find out how I made my sustainable Halloween bat garland, shown above.
DIY Vintage Halloween Table Runner
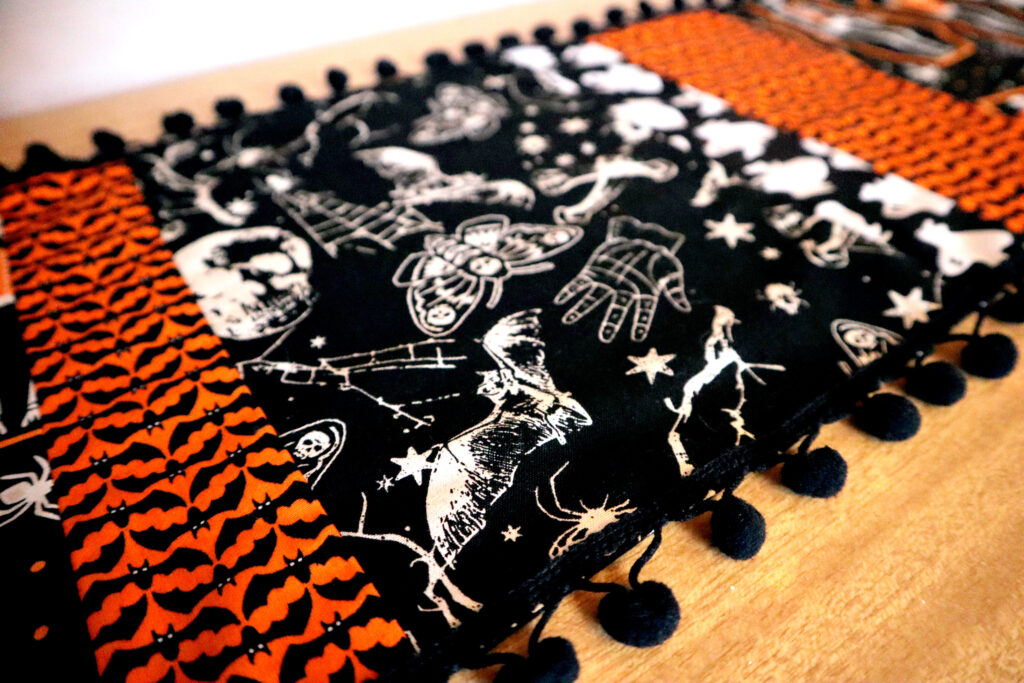
This one is a little more complicated and requires a sewing machine and basic sewing skills. Click here to find out how to make your own Halloween table runner.
Framed Death’s Head Hawk Moth original art
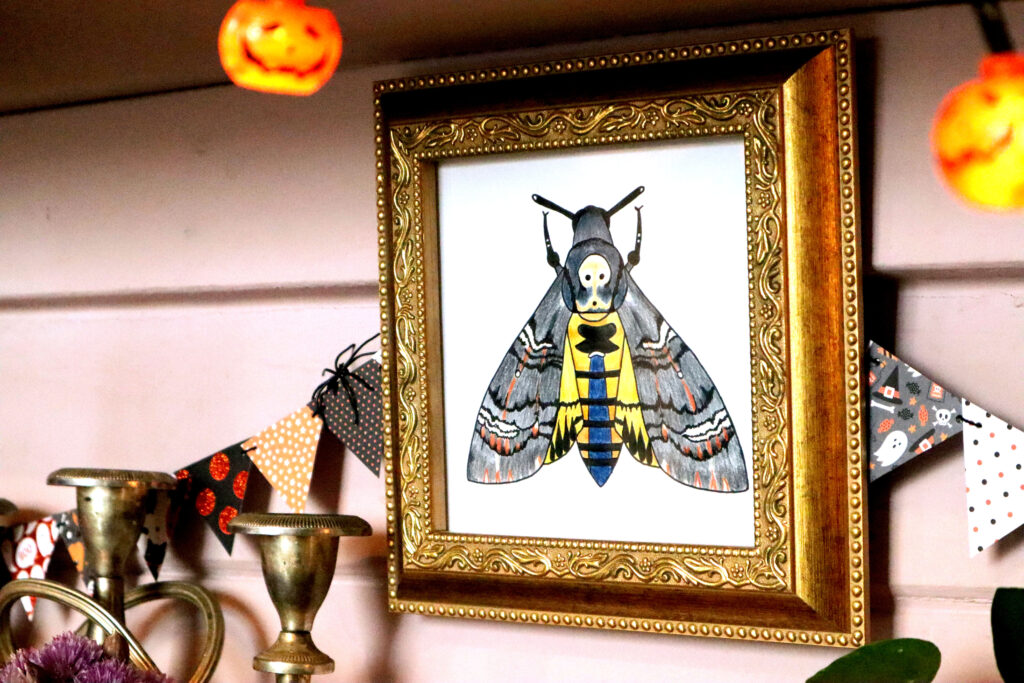
I think this was my favourite DIY because it was so simple and turned out really nicely. This is definitely a piece which I use as year round decor.
I thrifted the frame for a dollar a few years ago, but hadn’t found a good use for it yet. It popped into my head when I was planning this project and I just knew it would work perfectly.
I measured the inside of the frame so I knew how big to make my picture. Then I found a death’s head hawk moth picture on Google which I really liked.
I wanted it to look more like someone wearing a cloak or costume, than the typical wings outstretched pose, so I picked a reference picture with the wings down. Funnily enough I have a feeling I will actually make this into a costume one day!
I freehand sketched the outline in my sketchbook, to fit the size of the frame. When I was happy with it, I traced it onto old skool tracing paper and back onto a clean piece of paper.
I used my reference photo to pick pencil colours from the same set of 72 Derwent Studio pencils I’ve had since childhood. After colouring the moth to my liking, I went over all the lines and black sections with my trusty black 4mm Artline fineliner.
I cut the paper to size using the glass as a template, and popped the drawing into the frame. Job done!
Colouring pages are a great alternative
If you’re not confident in your drawing skills, you can look for a colouring page online. I chose pencils but you can obviously use any medium you like.
This would also be a really fun one to do with kids! You can easily print colouring pages for different bugs, snakes, spiders and other creepy crawlies.
If you want to frame your masterpieces, you can always pick up very cheap, quality picture frames from opshops or thrift stores.
This project took me a few hours and the vintage frame cost $1.
Painted papier mache Jack o’-lantern
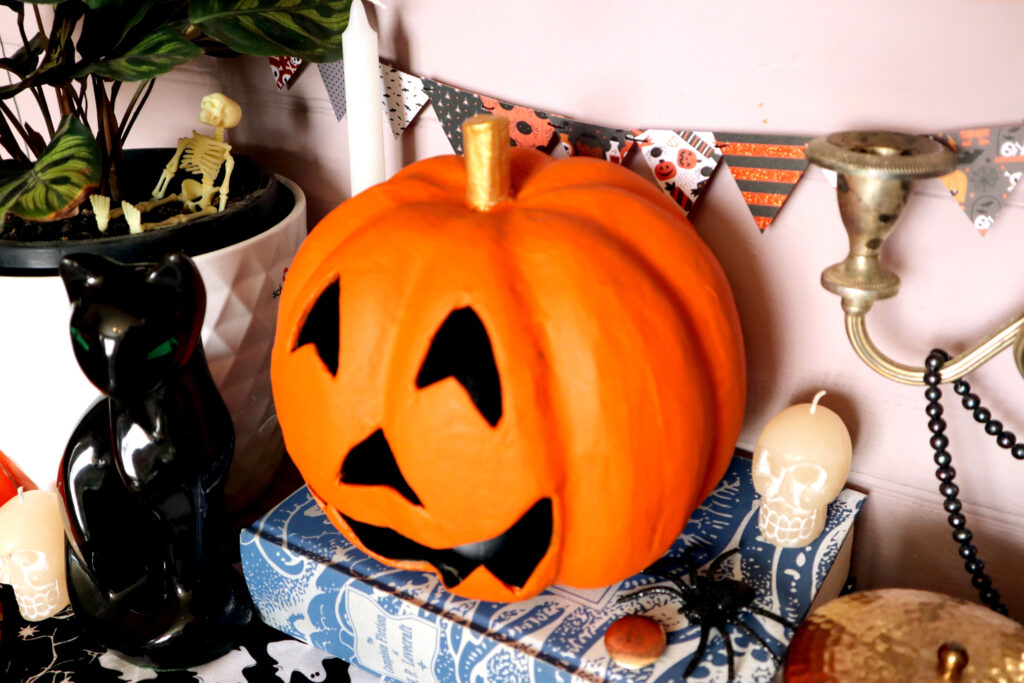
I bought this unpainted, it’s fairly self-explanatory. You should be able to pick up something like this from a local craft store. I used acrylic paints and didn’t bother to prime or undercoat.
I just painted the inside black (easier than it sounds, painting through the face holes!), put a few coats of orange paint on the outside, and painted the stem with gold paint. Leaving the paint to dry between colours and coats, of course.
I’ll probably end up repainting the outside in future to add a bit more shading and dimension.
For extra sustainability points, you can try making your own papier mache pumpkins, try hitting up Pinterest for tutorials.
I think I paid about $10 for the pumpkin, I already had the paints. it probably took about an hour, plus drying time.
Carved Jack-o’-lantern
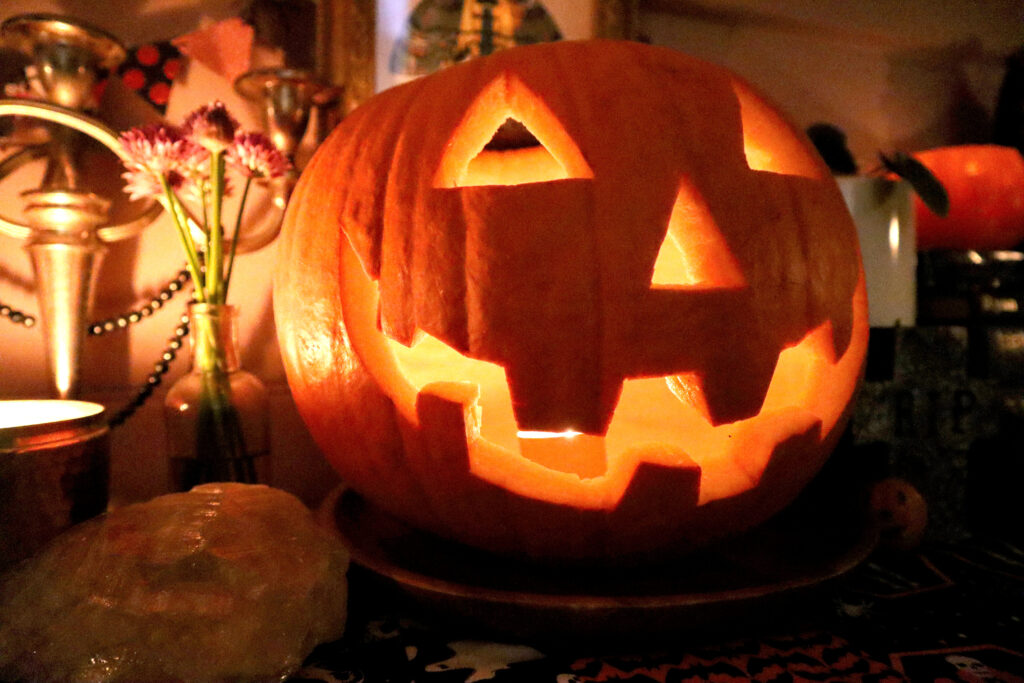
Dan gets the credit for this one! He’s definitely the jack-o’-lantern carver of the family. He did a wicked job with this one.
On a related note, don’t forget to compost your jack-o’-lantern once it starts to go mushy! If you don’t have access to a compost bin/pile or green waste bin, you can leave it out for wildlife, bury it, or just put it in a quiet corner of the garden, and let it slowly return to the earth.
I don’t know where the idea of painting or bedazzling pumpkins came from, but those do not count as sustainable halloween decorations. If you use paint, marker, glitter, sequins etc on your pumpkins, they can’t be composted.
If you can’t be bothered carving them, just leave them as is, they look beautiful enough with their natural shapes, sizes and colours. Then you can still eat them when the season is over, for sustainability bonus points.
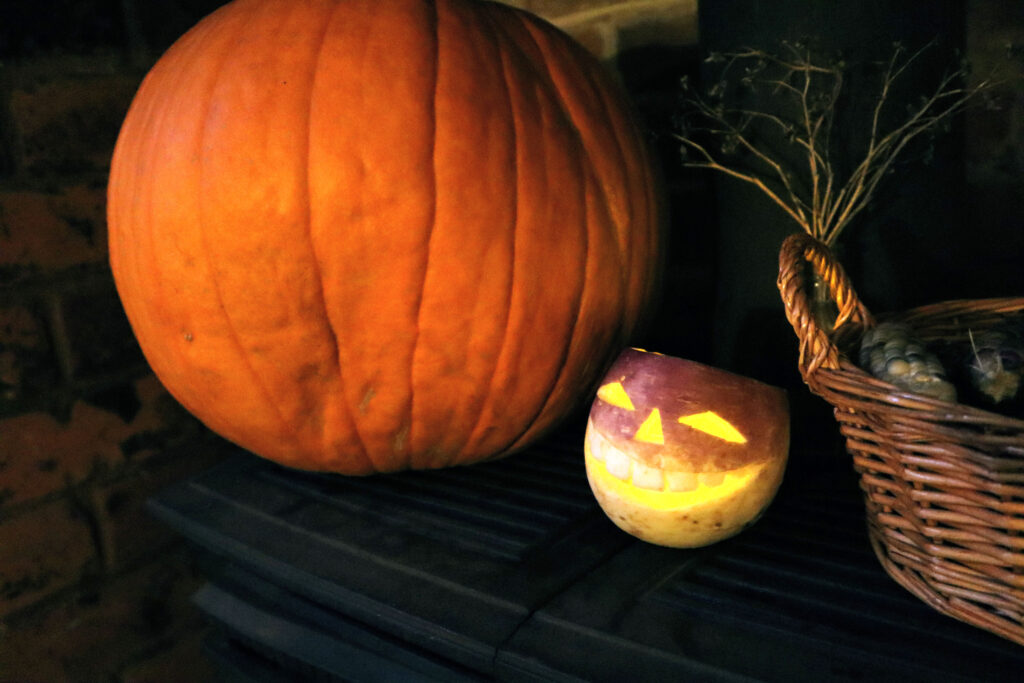
You could also try carving a tumshie heid! (Scottish for Turnip Head) The original Jack-o’-lanterns were made out of turnips because they didn’t have pumpkins in Europe until after the British colonised America. Dan also carved this one and he said it was actually pretty quick and easy, compared to a carving a big pumpkin.
Shopping tips for Sustainable Halloween Decorations
Buy second hand first
Obviously it’s preferable to shop and repurpose things you already own, or to make your own decor. But I love a good thrifted find, so I’m certainly not going to discourage that!
When you buy something secondhand, you instantly double it’s lifespan AND keep it from going to landfill. Plus, it’s generally far more affordable than a new item would be. That’s a win-win!
The key to thrifting seasonal decor, is to shop year round
Yes, you may find a few things in a seasonal thrift store display during and just after the holiday. Some people choose to upgrade or donate rather than pack things away. But don’t limit yourself to only shopping during the season. Or only shopping for season specific decor.
There are so many potential seasonal decor pieces to be thrifted year round. Again, it’s just about keeping an open mind about how to use and combine things in different ways.
It’s also about picking up good quality pieces when you come across them, because quality is timeless and translates across a wide range of styles and occasions.
None of the thrifted sustainable Halloween decorations I used in my display were bought specifically as Halloween decor, but they all work beautifully in that role.
Don’t limit yourself to just thrift stores
There are so many ways to buy second hand items these days, you can find just about anything you could possibly want.
Thrift stores, flea markets, garage sales, antique and retro stores are awesome for browsing in person. Then there’s searchable online platforms like facebook marketplace, local buy/swap/sell groups and ebay, where you can look for specific items, often in your local area.
In Australia we also have Gumtree, and Craigslist seems to be popular in America.
Get creative when it comes to wall art
Try to also think outside the box when it comes to wall art, like I did for our Halloween engagement party. Old calendars, art magazine cutouts, vintage anatomical drawings, and even old film x-rays can make cool sustainable Halloween decorations.
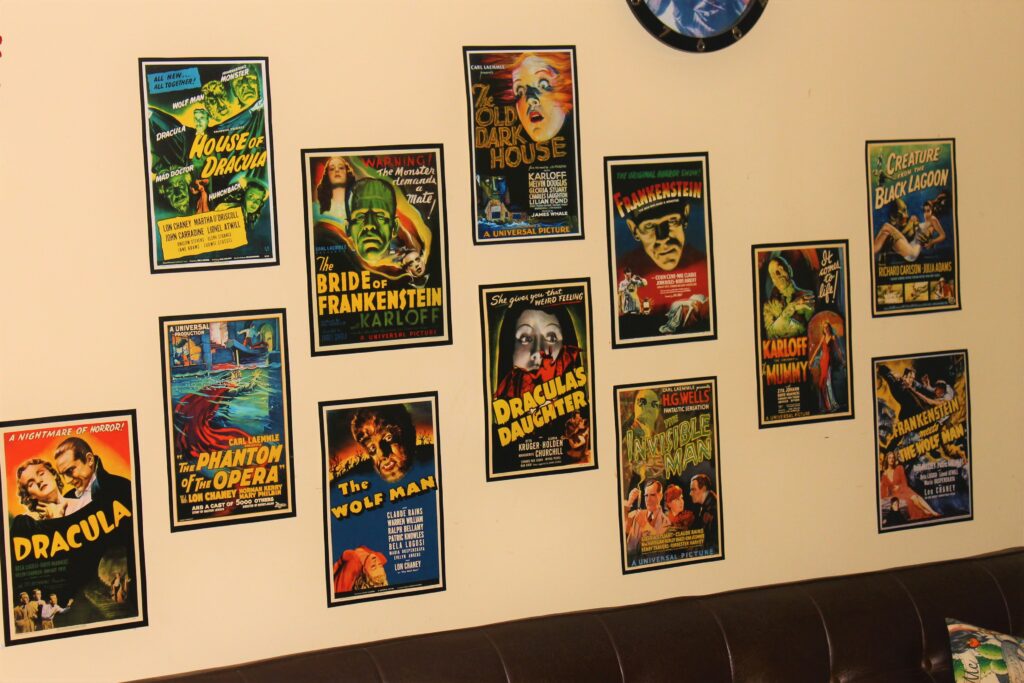
An Auntie of mine gifted us a calendar with horror/sci-fi movie art over a decade ago. Instead of just recycling the calendar in the new year, I kept it, because the art was super cool.
I didn’t know it then, but it just happened to be the perfect wall art to cover up some unattractive holes in our loungeroom wall, just in time for the party.

We went through a bunch of Dan’s old Juxtapoz magazines and cut out all the creepy cool pictures (which I also kept afterwards). We used blu-tac to stick them up in small gallery style arrangements around the place.
My chiropractor donated some vintage anatomical posters, which are always fun.
We also printed out copies of vintage black and white Halloween photos and used blu-tac to stick them on the walls in gallery arrangements.
I also wanted to keep my studio light on during the party, so people could see their way around the backyard. I didn’t just want to have a random room with a glaring light on, so I sticky taped some of my old film x-rays and brain MRIs to the inside of the windows. Sadly I couldn’t find any photos, but so many people commented on them! Obviously this is only an option if you have old x-rays or MRIs lying around, or know someone who does.
Be on the lookout year round for interesting things to repupose as wall art
You may not have these things at home already. But if you keep your eyes open you can sometimes find some of this stuff (like old art magazines, vintage anatomy/medical books or expired calendars) in thrift stores or flea markets. Libraries often sell their older books cheaply too. Or you could try searching online for specific second hand items.
If that sounds like too much trouble, I’ve got you covered. I have conveniently provided six free vintage anatomical printables on my free printables page for you to print out!
Consider not burning your “good” candles
This isn’t so much a shopping tip as a tip for avoiding shopping! I bought the gravestone candle, black and white skull candles, and wax jack-o’-lantern tealight holders for our engagement party. I still have them all these years later, because I don’t burn my good candles!
Candles can be bloody expensive. Mine weren’t expensive, but I won’t burn them anyway, because I think they’re cool and if I burn them, they won’t exist anymore.
I actually made my own bloody candles for the engagement party, by melting and dripping red wax (you can also use red crayon) on the top of plain white tapers and pillar candles. I thought I had a photo to share but there weren’t any clear ones of the candles. It’s pretty self explanatory though!
When I want light in my display at night, in addition to string lights, I use plain pillar candles, tapers and tealights (because they’re relatively cheap and accessible…but you could obviously use black or coloured ones instead, if that floats your boat).
Beeswax candles are the most sustainable, and I try to use them over other options whenever possible. Soy candles are more sustainable than cheap petrochemical parafin ones, but almost all soy beans produced these days are from GMO monoculture crops. Which is pretty unsustainable in my book.
Not burning my good candles, means I don’t have to go out and buy a bunch of brand new fancy candles every year! I know some people can afford to do this, but quite frankly, I don’t have the budget for it.
Some candles are also works of art in their own right, and sometimes it feels a bit wasteful and excessive to burn them.
If you absolutely MUST buy brand new Sustainable Halloween Decorations…
Don’t buy anything plastic or synthetic
This is my #1 rule for buying new items. Stick to items which will either last a long time, or those which will break down quickly or can be composted. Look for products made of metal, wood, ceramic, glass, paper, natural fibres etc. Avoid plastic and polyester like the plague.
Try to also stick to items without plastic packaging wherever possible. This can be hard with online shopping because you don’t know how it will be packed and shipped. But you don’t have that excuse when shopping in person. Don’t forget to reuse or recycle any cardboard packaging you do end up with.
If for some reason you absolutely HAVE to buy something plastic, see my next point.
Only buy stuff you plan to reuse forever
Don’t just shop for a season. For anything. Ever.
Think about versatility and longevity. Is the item sturdy and well-made? Will it last for many years, or could it easily be damaged or broken?
Can you use the item for a different season or celebration, or as part of your year round decor? Some Halloween decor is way too nice to only come out once a year!
Wait until just after Halloween to buy clearance craft supplies and decor
This is usually when they’re the cheapest because many companies don’t want to warehouse seasonal stock until next year, especially bulky stuff like fabric.
You not only save money, you may just save a few things from going to landfill too, and you get a whole year to plan your Halloween projects and displays!
Buy handmade items wherever possible
Most home decor (especially cheap seasonal decor) is produced in factories in China, in many cases using what is essentially slave labour. Much of it also contains toxic chemicals and dyes, among other things. I don’t think I need to explain that this is not sustainable.
Unless the company is transparent about their manufacturing processes, you should be wary of anything which is mass produced.
By choosing to buy from a maker or artist directly, you are supporting the move away from mass production and potential slave labour. And towards a society where creativity, originality, and quality workmanship are valued over immediate gratification, convenience and low prices.
Buy things which can be cleaned easily, or keep them behind glass
I try to steer clear of fragile or porous items which can’t be washed, or at least wiped down or shaken out. When they inevitably become dusty or dirty, they become unusable.
When I do have items like this, I try to make sure they’re kept behind or under glass. In this house, we refer to them as “dustcatchers”. (this is a reference from a bad Stephen King novel). They’re not inherently unsustainable, they just may not last very long without proper care.
Buy locally
Try to buy things made as locally as possible, or at least in your own country, wherever possible. Most people don’t think about the carbon miles associated with importing the goods they buy. If you must buy from overseas, make sure it’s a conscious decision.
Try to only do it if it’s something you really need (which is unlikely considering we’re talking about Halloween decorations here) and can’t source locally. I would probably make an exception if you’re supporting a marginalised maker or community overseas by buying directly from them though.
How to plan a cohesive display using sustainable Halloween decorations
I’ve given you my tips for shopping at home, making some of your own decor, and buying sustainably (if you absolutely have to buy). I’m sensing that your next thought is somewhere along the lines of:
“Thanks Maddy, that’s great…but how the hell do I put all this random stuff together, without it looking like a junk shop??”
Well, read on to find out my pro tips for creating a cohesive display!
Pick a colour palette, based on the main colours of your objects
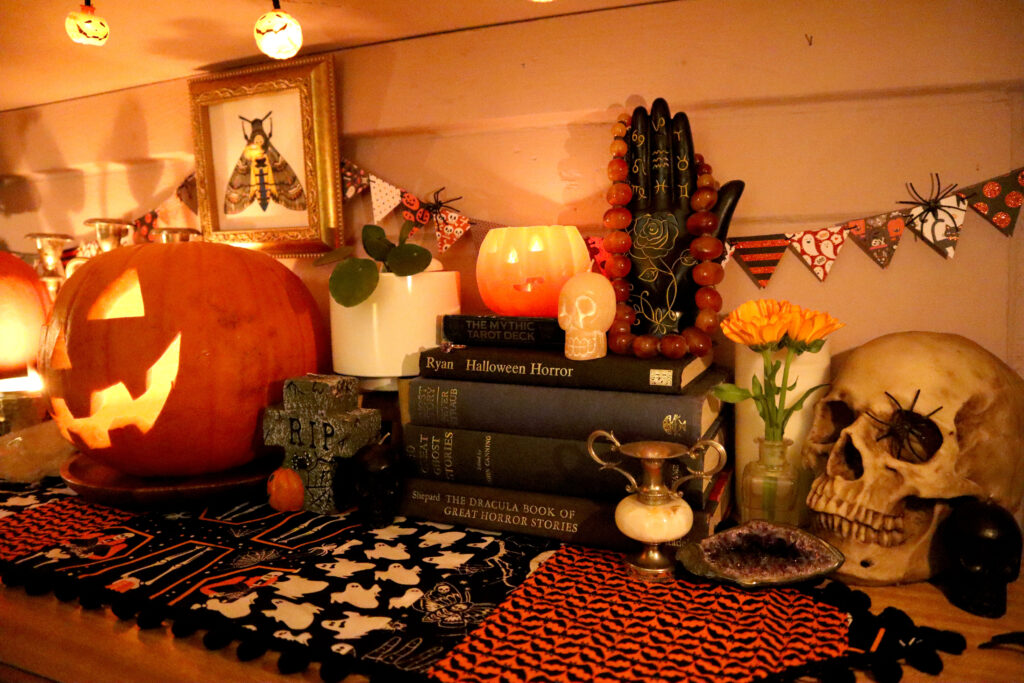
For my 2020 display I used the classic Halloween black, white and orange scheme, with dark purple and blue accents (I pulled the accent colours from my vintage book covers).
Orange and blue are complementary colours, which means they are opposite on the colour wheel. They create contrast and balance when used together in a colour scheme.
It’s a good idea to keep the same core decor and just change your accent colours now and then. It’s a great way to keep things fresh and incorporate different pieces each year. Without having to start from scratch.
Let go of the idea of everything matching perfectly or being “on trend”
Just be like Elsa, and let it go. You do not need a perfectly matching or coordinated display. In fact the most interesting displays usually have a discordant note. Something a little off. Which is actually ideal for a halloween display!
Perfection is the death of character, creativity and innovation. Don’t ever let yourself be convinced otherwise.
Sometimes concepts like “mixed metallics” or “maximalism” are either in or out of fashion. I think they always look good because I like a more eclectic, bohemian style.
I could not care less whether my sustainable halloween decorations are currently on trend or not. F*** trends. Trends are inherently unsustainable. Do whatever you like, for yourself.
On that ranty note…
Let’s make a cohesive Display using our Sustainable Halloween Decorations!
Gather your objects
Collect everything together in one place, make sure everything is clean and dusted and ready to go. Make sure your space is clean too.
Start with your base layer

I used my DIY Vintage Halloween Table Runner, mini bunting and Jack-o-lantern string lights as my base layer, but you can use whatever you like! Think scarves, shawls, lace, doilies, table runners, Halloween print fabric, black cheesecloth or muslin. They all make great base layers.
As do bunting, garlands, string lights, coloured or patterned paper, and wall art. Get creative with folding or draping fabric and try leaning framed wall art against the wall rather than hanging it.
If you’re creating a tablescape rather than a mantle or other one-sided display, obviously some of these (like wall art) won’t apply. You can still use battery string lights, just arrange them around the other main decor pieces on the table.
The base layer grounds and visually unites all the individual pieces. By sticking to neutrals and classic colours (like black, white and orange in this scheme) you can create a cohesive scheme. Which will be reusable in future years. Try to keep accent colours to smaller items which can easily be changed out of your rotation.
I didn’t use any ribbons, garlands or other trims, because I felt there was enough going on in my base layer with the bunting, string lights and runner. But you can go all out with whatever you like! This is the perfect opportunity to repurpose bits of sewing trims, lace, ribbon etc if you have those lying around.
Choose your centrepiece and anchor pieces
The centrepiece obviously goes right in the centre of your display. The anchor pieces are larger pieces on each end which “bookend” everything else.
The carved jack-o’lantern is undoubtedly the star of the show, but I also wanted my Death’s Head Hawkmoth illustration to have pride of place. So I hung it directly above the jack-o’-lantern. They were both the centrepiece in this display.
I used the resin skull and the large white plant pot (with the prayer plant and skeleton) as my anchors at each end.
Once you have placed your centrepiece and anchor pieces, you have a framework to arrange the rest of your pieces around.
Choose your major and minor accent pieces
Major accent pieces are the sustainable halloween decorations you want to feature. Minor accent pieces play a supporting or background role. There are no rules for how many or what you use, it just depends on your available space and personal taste.
For this display, the papier mache jack-o’-lantern and palmistry hand were my major accent pieces. I placed them on top of hardback books to give them more height and make them more of a feature. They were placed in the spaces between the anchor pieces and centrepiece.
The minor accent pieces were the silver candlestick, the small white plant pot with peperomia (and eyeballs) and the black ceramic cat.
Place your major and minor accent pieces and move them around until you’re happy with the general arrangement. When you like how the balance looks…
Start layering your filler objects
Such as candles, vases, figurines, nick nacks, trinket dishes, crystals, jewellery, rubber spiders etc. Generally it makes sense to start with the biggest of these pieces first, leaving the smallest pieces until last.
It’s annoying to have to keep moving around lots of little bits and pieces, and they’re best used for filling in gaps between and around bigger pieces.
Take your time with this, it usually takes me an afternoon to get it finished. I find it really helpful during this stage, to frequently step back and look at the whole arrangement, from different angles. If you’re creating a tablescape, be sure to walk around the table and view it from every side periodically.
Sometimes even leaving the room entirely (probably for a snack, knowing me) and coming back in, gives me a fresh perspective and helps me resolve design issues.
Find the balance between your sustainable Halloween decorations
It’s important to consider the relationship between all of your different pieces, and stepping back helps you do that. We want to avoid any really heavy or cluttered areas, but we also want to avoid big gaps or dull/stagnant areas.
The goal is to create contrast and balance between different heights, shapes, colours, textures and materials.
If you want to place similar items together, they look best in groups of three, or another odd number. An even number of similar objects can look regimented, formal and a little strange, because there’s no real focal point.
In an odd numbered grouping, the middle item automatically becomes the focal point, giving your eye somewhere to rest. This is also the rationale behind the centrepiece + two anchor pieces technique.
Last but not least: Be sure to incorporate some sustainable Halloween decorations gathered from nature
My 2021 display will have it’s own post (eventually), but I just wanted to show a nice example of foraged natural sustainable halloween decorations used in a display. The cockatoo and rosella feathers and blue eggshell were found on walks in the neighbourhood. I found the chunk of lichen in the front yard (it fell off the tree).
The funny looking green and purple stems next to the jack-o’-lantern are ranunculus seed heads which I had just deadheaded in the garden. I really liked their alien quality, so I added them to my display. The wish bone was from a delicious roast chicken, which we also made into chicken stock!
And that, my friends, is how you create a cohesive display using sustainable Halloween decorations!
When Halloween is sadly over for another year, just be sure to pack anything you don’t plan to use year round away carefully, so you can easily use it again next year. Nobody wants to spend hours untangling string lights and bunting. Shudder.
Final thoughts on Sustainable Halloween Decorations…
I realise that it can be overwhelming knowing where to start when it comes to sustainable Halloween decorations. Especially with so many brands aggressively marketing their “sustainability” at you.
I very deliberately did not mention or link to any decor brands, because I don’t endorse rampant consumerism.
Buying brand new items, even “sustainable” ones, is generally the least sustainable option, and I really encourage moving away from this kind of thinking.
Yes, we all need to buy new items now and then, but we CANNOT buy our way out of this hole we’ve dug for ourselves.
Try to keep in mind that it’s not all or nothing when it comes to sustainability. Every little change you make adds up. Every conscious consumer decision makes a difference.
I’m certainly not perfect, and I don’t expect you to be either. Just do your best. That’s all we can ever do.
I hope this guide helps you to get started (or become more involved) with sustainable design and decor. At the end of the day, it is just a guide though. I don’t really believe in “design rules”, so feel free to break as many of them as you like.
I’d really love to see your sustainable Halloween decorations on display! Tag me @maddythemaker on Instagram.
Did you find this guide helpful? Do you have any other ideas for sustainable Halloween decorations? Share them in the comments!
Have a happy sustainable Halloween!
[optin-monster-inline slug=”qdfs5cowsxbtmmucnrtm”]